You can use fusible interfacing if you like, non-woven or tricot. If you use tricot then you should cut it cross grain and place it parallel to the hemline.
If you are using velvet or velour you should not be using fusible interfacing. It is best to always to test your fabric with the fusible interfacing first.
If you are doing alteration it is best to use the same kind of interfacing as the original one on the garment.
In order to fix the problems you are having, you need to extend the front crotch line and the back crotch line outward in the same direction.
For your particular body shape you need to try and find out how much these extensions will be.
For example you can add 1 cm to the front and 2 cm to the back pattern. Then you need to merge this points with the original inseam lines, even merging right at the hemline if you like.
You can also extend the hemline out on the inseam side then draw a new inseam line parallel to the previous one, intersecting the extended hemline at the bottom. You do this on the front and back pattern.
Finally you should decrease the curve at the top of the inseam lines below the crotch point, on the front and back. So that the lines do not go in too much and effect the inner thigh area.
It's best if you make a muck up on muslin.
Doing these things should fix the problems you mentioned.
This ottaman was done in a thick fabric which would not allow me to fold the pleats and iron in place. So, I had to make #24 individual skirts to get this one to come out correct. One large covered button was added to the center and contrast piping in lime green.
This is a quick and inexpensive way to spruce up the old lamps. Cover them yourself and you can use whatever accents you want, from piping to decorative trim and beads. Try It!
These look like a simple project but small jobs can be very tiring. They make for as much details or more than a large job and can take more time doing them.
The best way to slipcover for me, is to pull the fabric off the bolt and lay over the chair, pin in place cut the pieces leaving seam allowance until you have all the pieces cut to the chair. Then you can began adding the piping so you can attach each piece. It will always fit because you chalked it on the original piece instead of measuring and making a mistake.
When doing upholstery the same yardage can be used as well for slipcovers. The only difference is with upholstery you are tearing the furniture down to recover it and repair the structure. With slipcovers it's all sewing and measurements.
I am new here, I really love this website and I know I can ask about any professionally help. Im on beginning so Im happy I find this side. Thank you...
I hope you like all of my projects. I have several disabilities but I don't let it get me down. Sewing keeps me going and I love it. I do so many things that include sewing from upholstery to slipcovers to bridal to crafts and monograms. Happy sewing everyone. I was just glad to share my talents.
Welcome to the site. I hope you can benefit from the lessons and improve your skills along the way. One of the reasons we made this site was to provide a place where people who don't have a sewing class near by or don't have the time to attend one can do so online.
I am sorry I haven't got back to you, but we have had a busy time....Because I am narrow in the chest, and through the neck, and I have a large bust, I find that I suffer from "Gaposis" that is a large excess of material in the front, and am not sure how to get rid of this, the correct way...please can you help.
You can find a link to a diagram showing how the pieces of a common V neck scrub top come together. I answered someone else regarding this issue. Click Here to find it.
I have the material pinned together but not sure how it will come together. I have to stay stich it but would like to see an example. It is a v neck on a scrub top. Thanks for your help. J
Sometimes we make mistake when taking the measurements. I suggest you take the upper and lower hip measurement again. Another thing to look out for is that you may have taken the upper hip measurement too high up or the lower hip to large. Check to make sure that the pattern measurements are correct as well. You may have drafted the pattern a bit off.
Looking at your body shape I can see that you may have raised the front of the measuring tape to high when taking the lower hip measurement. Since your belly is higher up, doing this has increased your lower hip circumference and caused the upper hipline on the pattern to become longer as well. So you need to bring up the front of the measuring tape when taking your upper hip measurements to your belly but not do so as much when taking the lower hip circumference.
If you double check and see that the pattern is still bigger along the upper hipline. You need to divide the upper hip circumference by 2 and compare it to your measurements from the pattern (those numbers you added together).
For standard body shapes we usually get a pattern that is smaller than the actual body measurement for the upper hip , once we divide the upper hip circumference by 2. In this case we divide the difference by 2 and add it to the pattern along the upper hip line. Then draw a curve there from the waistline to the lower hipline passing at the new mark on the upper hipline.
In your case assuming that you measured and drafted everything correctly, the upper hipline on the pattern is larger than half of the upper hip circumference measurement. This is possible as well since we all have different body shapes. So you need to deduct half the difference from the back pattern and half from the front. Based on my calculation your difference is 2.6 cm divided by 2 it is 1.3 cm.
So what you need to do is extend the dart points down by either 1, 2 or 3 cm and redraw all the darts, including the new shorter ones and the center back dart where the zipper will go. Extend the center line of the darts and mark alon ght center line measurng from the dart point. Then connect the top marks to the new dart point to extend the dart lengths.
This process increases the dart length and takes away more from the upper hipline area on the pattern. Then compare the length of the upper hipline with the half of the upper hip circumference and see what happens. It is preferable that you end up getting a smaller upper hipline on the pattern when you extend the darts. This way you can add a little at the side seams to get a curved line in this area. Its better if you can add about 2 mm to the front and back patterns at the side seams along the upper hipline.
Basically you shorten the upper hipline on the pattern just a bit more than the difference, by extending the dart lengths, so that you can add a bit to the side even though you could not do this before.
I suggest you extend and draw all the front and back darts by 1 cm first using a different color and see what you get. Then try extending by 2 cm if you need to again with a different color and so on. This way you will find out how much you need to lengthen the darts by to get what you need.
I have done this procedure a lot of times when sewing garments, or teaching live classes.
I completed drafting the front/back patterns and am up to checking the upper hip measurements.
On the back pattern I get 9.9 + 11.2 = 20.9
Front pattern: 23.1
Total 44 cm
High hip circumference = 83.2 divided by 2 gives 41.6
41.6 - 44 = - 2.4 cm /4 = - 6 mm
Then my brain froze. The video shows how to add the curve and I'm stumped because it's like I'll have to go in from the lower hip and then back out for the waist?
Should I just make the lower and upper hip the same number and work it like that? That would give me 92/2 = 46 - 44 = 2 cm divided by 4 resulting in .5 cm to add to each side.
Fist option is to draft the pattern and add the seam allowances as it is instructed in the lesson and sew the pants using muslin to test the fit. You may like this fit the way it is without changing it.
However if you like your pants a bit larger, make it larger on the muslin along the side seams and try on. Once you find the fit that you like you can add the wearing ease to your own pattern, then add the seam allowances.
Below you can find another way of adding wearing ease:
I suggest that once you finish the pattern, before adding the seam allowances you can add about 2 cm in total at the waistlines where it meets the side seams. This means 5 mm on the actual patterns from the side seams.
And about 4 cm in total at the crotch level lines where they meet the side seams. This means 1 cm away from the existing seam lines since you are working with just half of the front and back patterns.
Connect the new point and then draw a line parallel with the old side seam to the hemline, or merge the line with the old side seam at the hemline.
Thanks for the kind words. Thanks for your suggestions. We are working on releasing new video lessons using the pants and the bodice block patterns in the next few lessons.

I got your instructions for my skirt. Thanks, it help a lot. Now my skirt is done.
Thank You again,
Melody
Dear otadedokun,
Welcome to eSewingWorkshop. I will add your suggestion to my list for future lessons.
Happy sewing,
Nehzat
Dear Kay,
Welcome to eSewingWorkshop. I hope you will learn and benefit from our video lessons. Please share your work with us.
Happy sewing,
Nehzat
Dear Jan,
Please watch the: Straight and Tapered Skirt Block Pattern Making (Drafting) Video Lessons. Specifically pay close attention to this chapter: 14. Adding Seam and Hem Allowances and Skirt Sewing from a Pattern Video Lessons again.
Since you are not sewing in a lining, you can disregard the sections showing how to cut and insert a lining.
I have shown step by step what you need to do to sew the slit area as well.
Happy sewing,
Nehza
my name is nike ,l just sign in,l will like to learn how to make ballon short grown
Dear Aby,
Welcome to eSewingWorkshop. I hope that you will benefit from the video lessons.
To buy the tools you want such as French curve, the most convenient place online is eBay. Here is the link for you in Euros.
Happy sewing,
Nehzat
Dear jnjewel,
You can use fusible interfacing if you like, non-woven or tricot. If you use tricot then you should cut it cross grain and place it parallel to the hemline.
If you are using velvet or velour you should not be using fusible interfacing. It is best to always to test your fabric with the fusible interfacing first.
If you are doing alteration it is best to use the same kind of interfacing as the original one on the garment.
Happy sewing,
Nehzat
Dear Jaybee,
In order to fix the problems you are having, you need to extend the front crotch line and the back crotch line outward in the same direction.
For your particular body shape you need to try and find out how much these extensions will be.
For example you can add 1 cm to the front and 2 cm to the back pattern. Then you need to merge this points with the original inseam lines, even merging right at the hemline if you like.
You can also extend the hemline out on the inseam side then draw a new inseam line parallel to the previous one, intersecting the extended hemline at the bottom. You do this on the front and back pattern.
Finally you should decrease the curve at the top of the inseam lines below the crotch point, on the front and back. So that the lines do not go in too much and effect the inner thigh area.
It's best if you make a muck up on muslin.
Doing these things should fix the problems you mentioned.
Let me know how this works out for you,
Happy sewing,
Nehzat
Dear Ellie,
Welcome to our site. I hope that you benefit from the lessons and share your accomplishments with us.
Happy sewing,
Nehzat
This ottaman was done in a thick fabric which would not allow me to fold the pleats and iron in place. So, I had to make #24 individual skirts to get this one to come out correct. One large covered button was added to the center and contrast piping in lime green.
This is a quick and inexpensive way to spruce up the old lamps. Cover them yourself and you can use whatever accents you want, from piping to decorative trim and beads. Try It!
These look like a simple project but small jobs can be very tiring. They make for as much details or more than a large job and can take more time doing them.
The best way to slipcover for me, is to pull the fabric off the bolt and lay over the chair, pin in place cut the pieces leaving seam allowance until you have all the pieces cut to the chair. Then you can began adding the piping so you can attach each piece. It will always fit because you chalked it on the original piece instead of measuring and making a mistake.
When doing upholstery the same yardage can be used as well for slipcovers. The only difference is with upholstery you are tearing the furniture down to recover it and repair the structure. With slipcovers it's all sewing and measurements.
I am new here, I really love this website and I know I can ask about any professionally help. Im on beginning so Im happy I find this side. Thank you...
I hope you like all of my projects. I have several disabilities but I don't let it get me down. Sewing keeps me going and I love it. I do so many things that include sewing from upholstery to slipcovers to bridal to crafts and monograms. Happy sewing everyone. I was just glad to share my talents.
Dear khill_2011
Welcome to the site. I hope you can benefit from the lessons and improve your skills along the way. One of the reasons we made this site was to provide a place where people who don't have a sewing class near by or don't have the time to attend one can do so online.
Happy sewing,
Nehzat
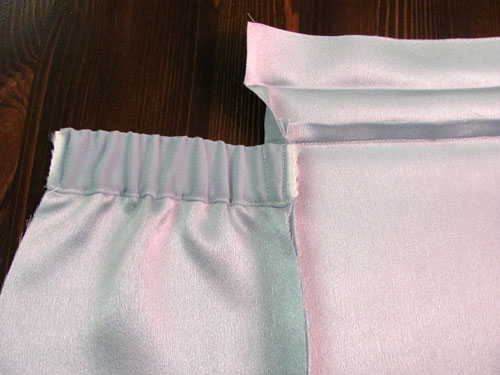
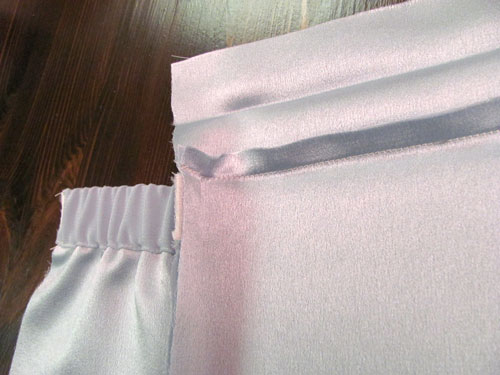
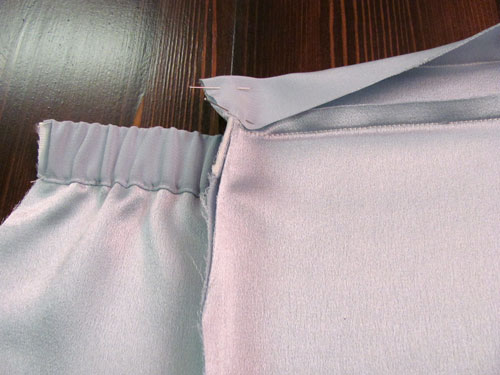
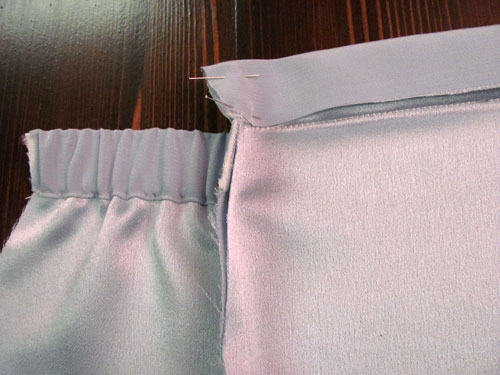
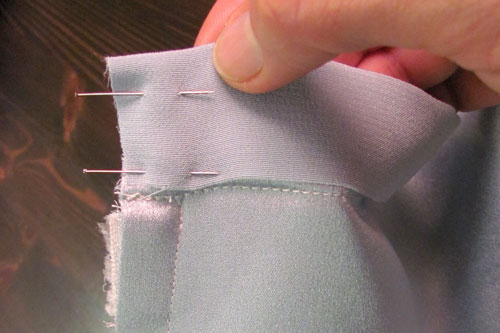
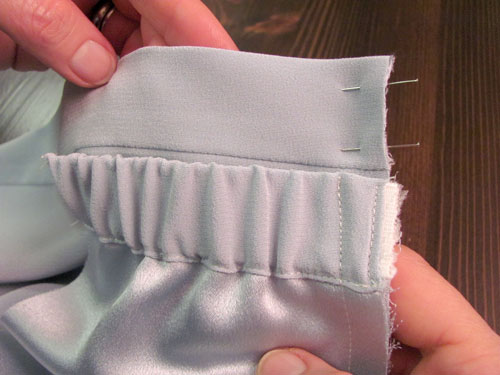
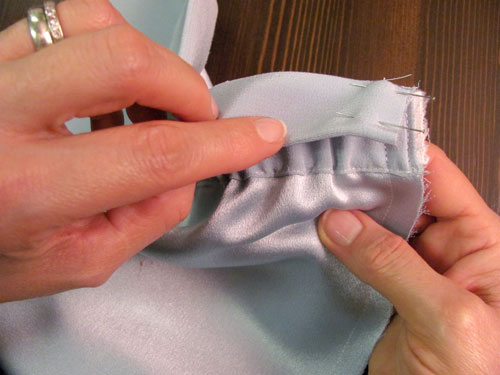
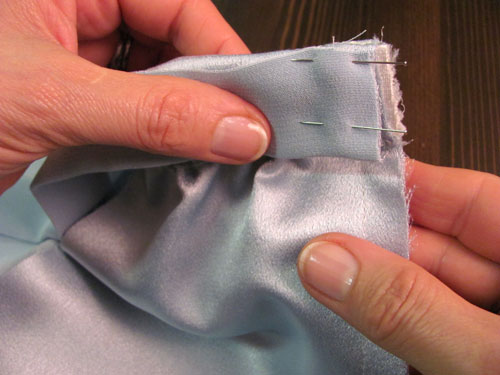
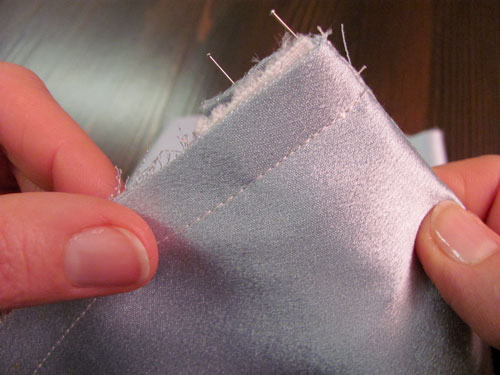
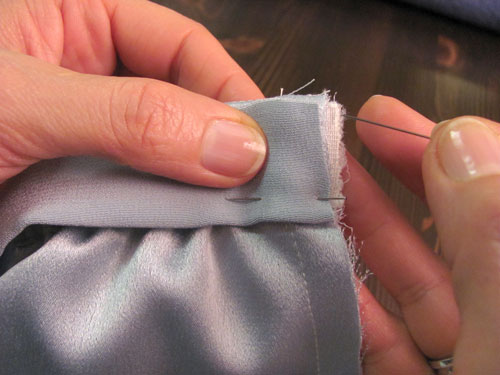
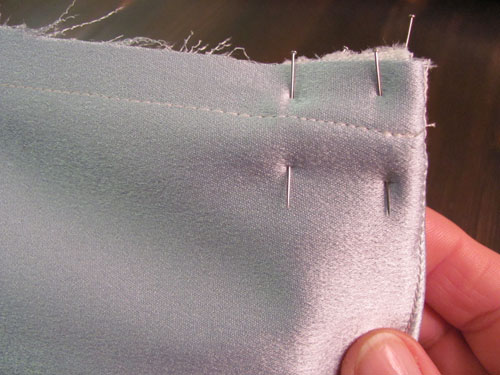
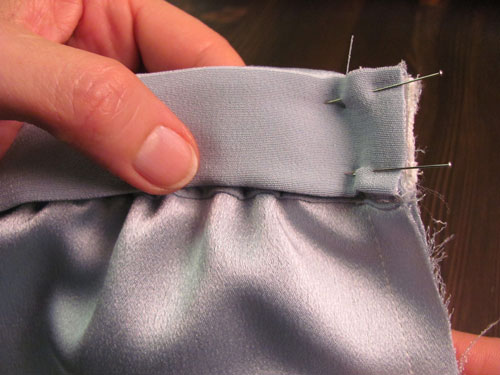
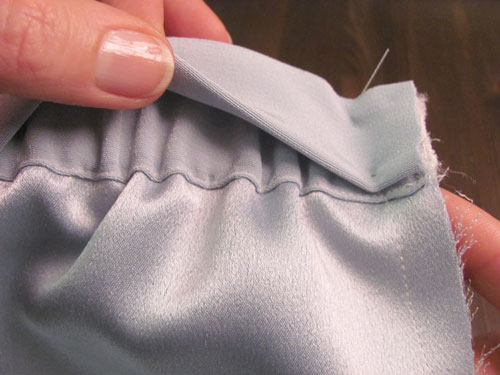
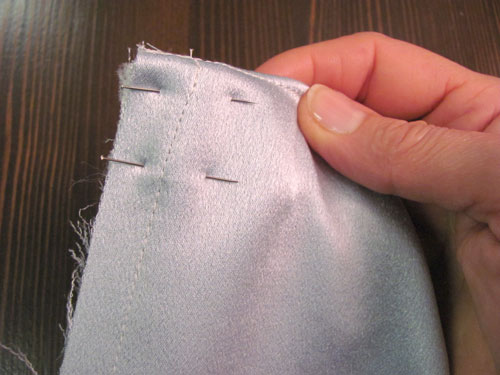
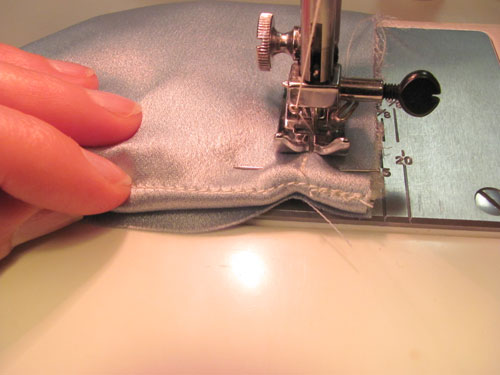
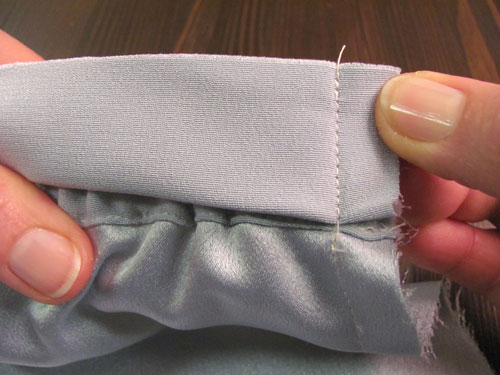
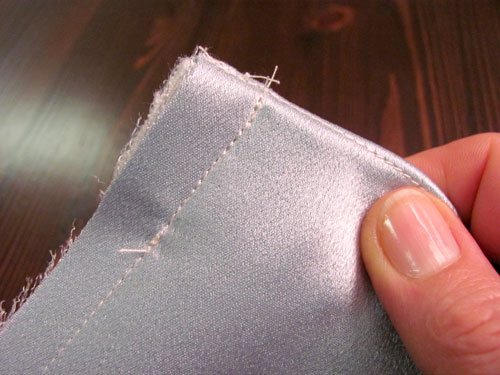
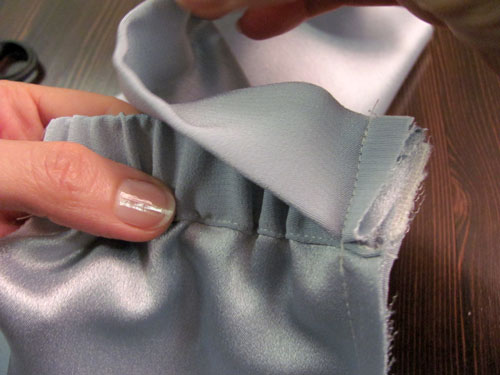
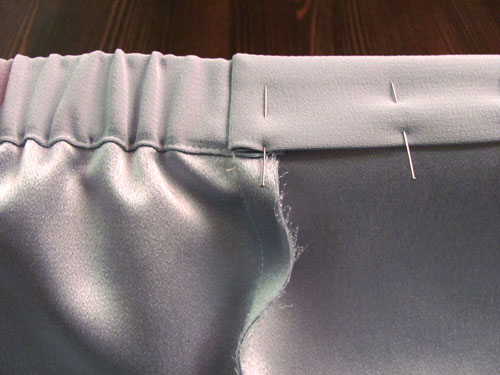
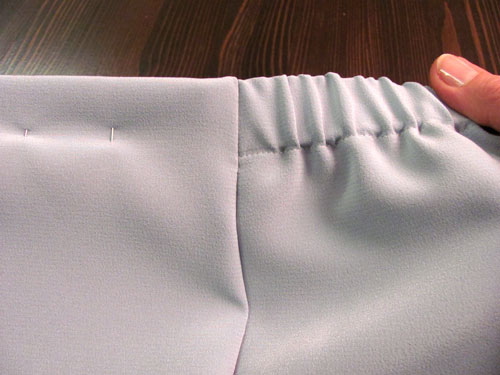
Dear Melody,
Below please find the steps you need to follow in order to join the front waistband to the back elastic casing.
The images are of the top of the side seam, where the two sides come together.
1.
2.
3.
4.
5.
6.
7.
8.
9.
10.
11.
12.
13.
14.
15.
16.
17.
18.
19.
20.
21.
I am sorry I haven't got back to you, but we have had a busy time....Because I am narrow in the chest, and through the neck, and I have a large bust, I find that I suffer from "Gaposis" that is a large excess of material in the front, and am not sure how to get rid of this, the correct way...please can you help.
Dear J,
You can find a link to a diagram showing how the pieces of a common V neck scrub top come together. I answered someone else regarding this issue. Click Here to find it.
Happy sewing,
Nehzat
I have the material pinned together but not sure how it will come together. I have to stay stich it but would like to see an example. It is a v neck on a scrub top. Thanks for your help. J
Dear Suzkim,
Sometimes we make mistake when taking the measurements. I suggest you take the upper and lower hip measurement again. Another thing to look out for is that you may have taken the upper hip measurement too high up or the lower hip to large. Check to make sure that the pattern measurements are correct as well. You may have drafted the pattern a bit off.
Looking at your body shape I can see that you may have raised the front of the measuring tape to high when taking the lower hip measurement. Since your belly is higher up, doing this has increased your lower hip circumference and caused the upper hipline on the pattern to become longer as well. So you need to bring up the front of the measuring tape when taking your upper hip measurements to your belly but not do so as much when taking the lower hip circumference.
If you double check and see that the pattern is still bigger along the upper hipline. You need to divide the upper hip circumference by 2 and compare it to your measurements from the pattern (those numbers you added together).
For standard body shapes we usually get a pattern that is smaller than the actual body measurement for the upper hip , once we divide the upper hip circumference by 2. In this case we divide the difference by 2 and add it to the pattern along the upper hip line. Then draw a curve there from the waistline to the lower hipline passing at the new mark on the upper hipline.
In your case assuming that you measured and drafted everything correctly, the upper hipline on the pattern is larger than half of the upper hip circumference measurement. This is possible as well since we all have different body shapes. So you need to deduct half the difference from the back pattern and half from the front. Based on my calculation your difference is 2.6 cm divided by 2 it is 1.3 cm.
So what you need to do is extend the dart points down by either 1, 2 or 3 cm and redraw all the darts, including the new shorter ones and the center back dart where the zipper will go. Extend the center line of the darts and mark alon ght center line measurng from the dart point. Then connect the top marks to the new dart point to extend the dart lengths.
This process increases the dart length and takes away more from the upper hipline area on the pattern. Then compare the length of the upper hipline with the half of the upper hip circumference and see what happens. It is preferable that you end up getting a smaller upper hipline on the pattern when you extend the darts. This way you can add a little at the side seams to get a curved line in this area. Its better if you can add about 2 mm to the front and back patterns at the side seams along the upper hipline.
Basically you shorten the upper hipline on the pattern just a bit more than the difference, by extending the dart lengths, so that you can add a bit to the side even though you could not do this before.
I suggest you extend and draw all the front and back darts by 1 cm first using a different color and see what you get. Then try extending by 2 cm if you need to again with a different color and so on. This way you will find out how much you need to lengthen the darts by to get what you need.
I have done this procedure a lot of times when sewing garments, or teaching live classes.
Hope this helps,
Nehzat
I completed drafting the front/back patterns and am up to checking the upper hip measurements.
On the back pattern I get 9.9 + 11.2 = 20.9
Front pattern: 23.1
Total 44 cm
High hip circumference = 83.2 divided by 2 gives 41.6
41.6 - 44 = - 2.4 cm /4 = - 6 mm
Then my brain froze. The video shows how to add the curve and I'm stumped because it's like I'll have to go in from the lower hip and then back out for the waist?
Should I just make the lower and upper hip the same number and work it like that? That would give me 92/2 = 46 - 44 = 2 cm divided by 4 resulting in .5 cm to add to each side.
~suzkim
Dear Janramsay,
Fist option is to draft the pattern and add the seam allowances as it is instructed in the lesson and sew the pants using muslin to test the fit. You may like this fit the way it is without changing it.
However if you like your pants a bit larger, make it larger on the muslin along the side seams and try on. Once you find the fit that you like you can add the wearing ease to your own pattern, then add the seam allowances.
Below you can find another way of adding wearing ease:
I suggest that once you finish the pattern, before adding the seam allowances you can add about 2 cm in total at the waistlines where it meets the side seams. This means 5 mm on the actual patterns from the side seams.
And about 4 cm in total at the crotch level lines where they meet the side seams. This means 1 cm away from the existing seam lines since you are working with just half of the front and back patterns.
Connect the new point and then draw a line parallel with the old side seam to the hemline, or merge the line with the old side seam at the hemline.
Happy sewing,
Nehzat
Dear Gita,
Thanks for the kind words. Thanks for your suggestions. We are working on releasing new video lessons using the pants and the bodice block patterns in the next few lessons.
Happy sewing,
Nehzat